|
Customer reviews are essential to any business. In today’s modern world, where information about anything and everything is available online, consumers and businesses alike are likely to look for reviews of products or services they’re considering before buying. Lack of feedback – or even worse, negative feedback – can spell disaster for an app or SaaS company. Not only does it make potential customers think twice before buying, but it also casts doubt on the quality of products or services available to them. Customer feedback is also vital for digital product companies to grow and evolve. It’s how they know what their customers want and which features can help them stand apart. They also benefit from the ability to improve upon products or services that may be lacking. Several challenges are facing B2B and SaaS companies when it comes to managing customer reviews and feedback:
To benefit from the insights provided by customer reviews, businesses must have a platform that can centralize all feedback and make it easy to use. Userwell is a product review management solution designed primarily for app, software, and SaaS businesses to solve these challenges and manage their feedback more efficiently and productively. What is Userwell?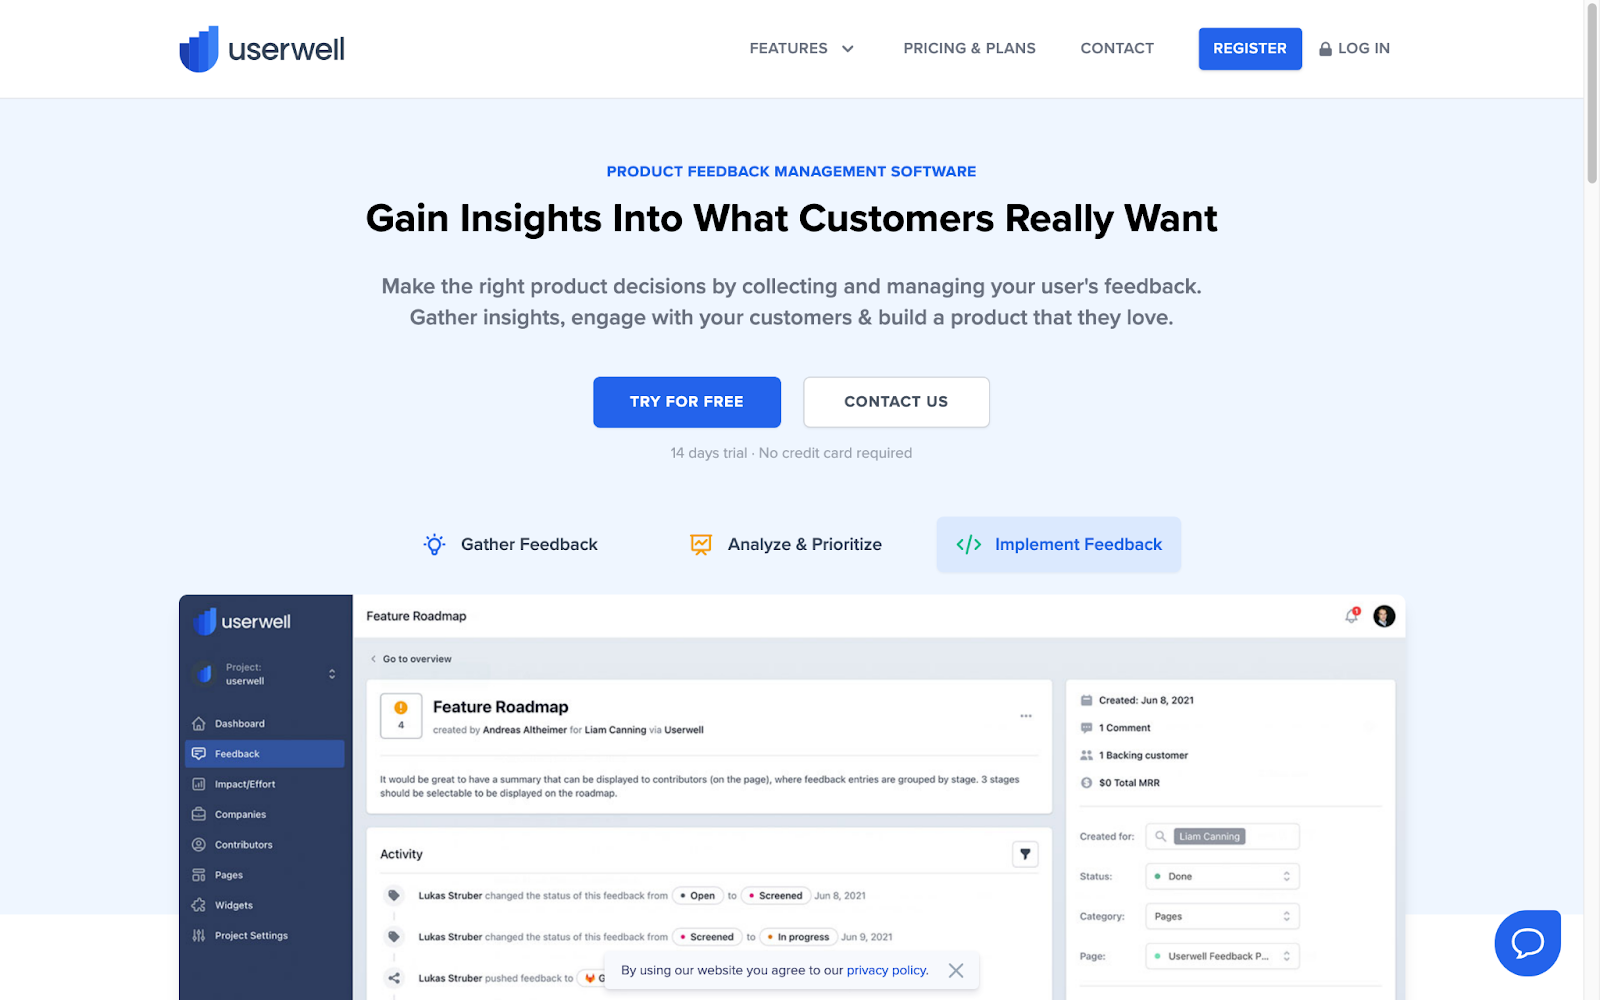
Userwell is designed to make it easier for you to collect feedback and information about what your customers really want. You can then use this information to make product improvements based on actual data, not just on speculation or guesswork. The platform is also designed to give you a better understanding of what your customers are saying, so you can always be prepared with the right answers for any question that may arise. Userwell acts as a unified platform to gather and act on feedback with three main functions:
Userwell FeaturesThe Userwell platform has been designed specifically for the needs of businesses that want to use customer feedback to improve their products. A clean and simple user interface makes it easy to view all feedback gathered in one place and create reports based on user input so you can easily track progress and see how your product or service is doing in the market. Gather InsightsYou can use Userwell to create feedback pages so that your users can easily submit reviews and product ratings. From the platform, you can directly engage with your customers and keep them informed about how you’re acting on their feedback. Userwell also integrates with over 1,000 third-party applications so you can gather feedback from multiple sources and keep all reviews and your responses in one place. Other features include:
Analyze and PrioritizeWhile some companies focus on reviews for marketing and reputation management, Userwell is designed for businesses that actively want to improve their products based on what customers are saying. You can use the platform to understand precisely what your customers want, engage with them to clarify or get more details, and ensure all your feedback is safely filed away, so it never gets lost or forgotten about.
Implement FeedbackWith Userwell, you can easily use customer feedback to inform stakeholders about your product decisions and show users the product roadmap for what lies ahead. You can easily show users which features are planned, in progress, or done with roadmaps on feedback pages. It’s also quick and straightforward to convert feedback into project management tasks and integrate directly with tools like Zapier, Slack, and Zendesk. An Overview of the Userwell PlatformSo now you understand what the Userwell is, what exactly is it like using the platform on a daily basis? Getting Started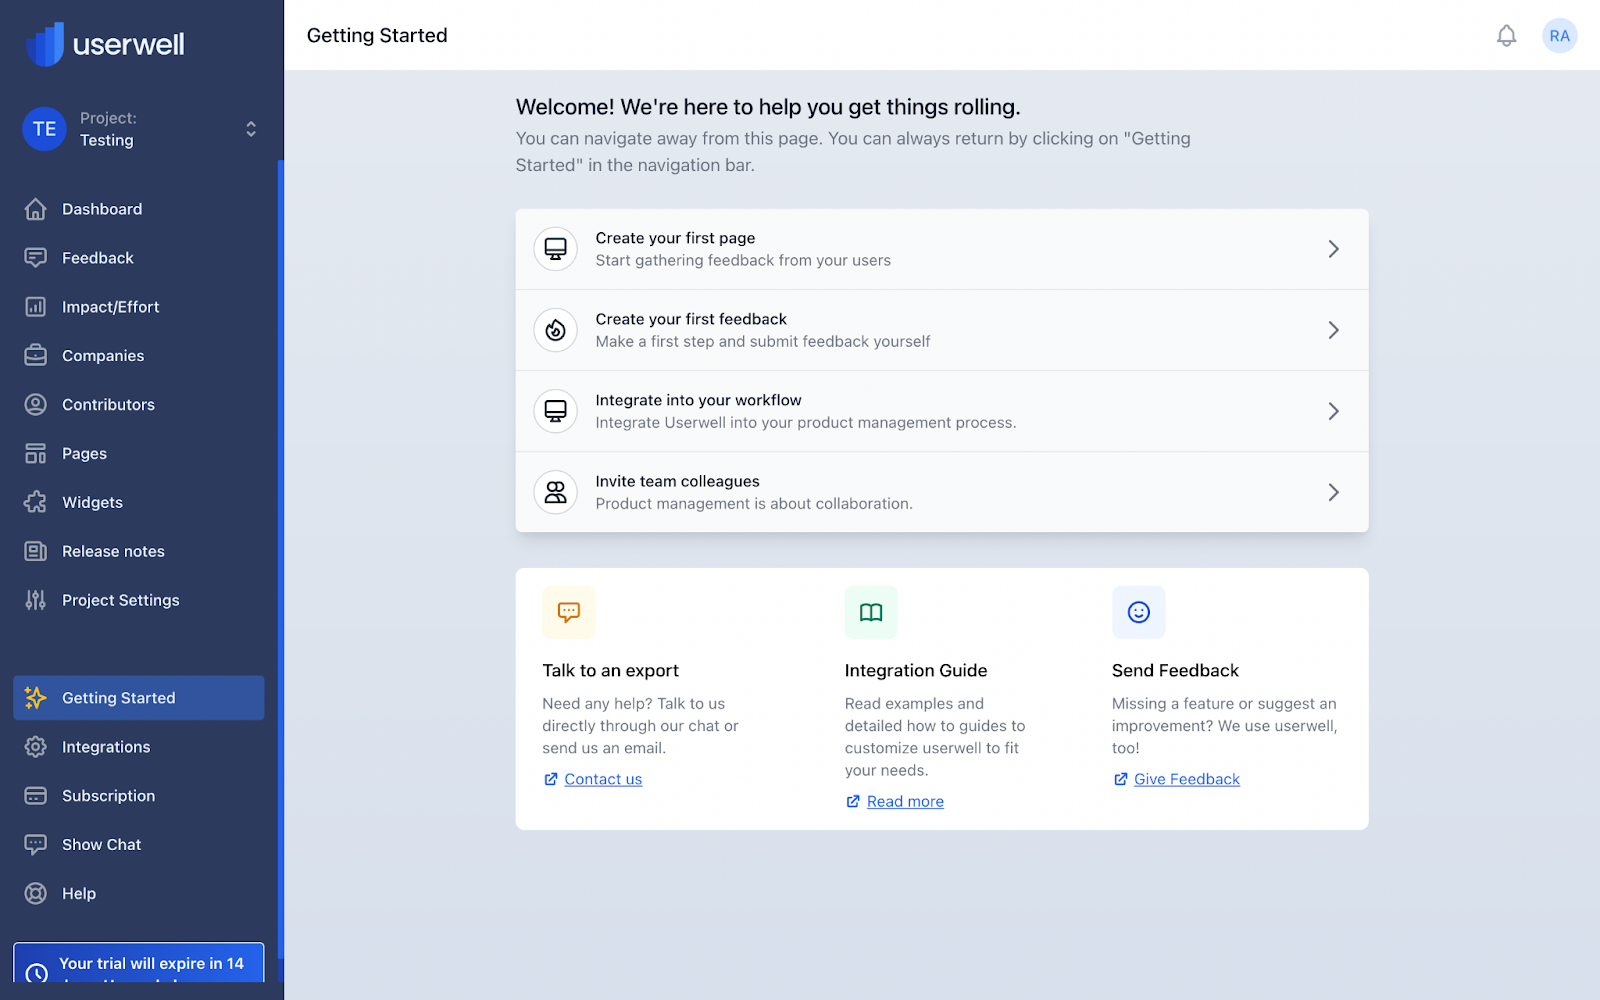
On signing up for Userwell, you’ll be taken to this “Getting Started” page, which walks you through the process of using the platform step-by-step. This page includes quick links to:
There are also support links to contact Userwell support directly via email or chat, guides for customizing and integrating Userwell, and sending feedback as a user via the Userwell platform. Dashboard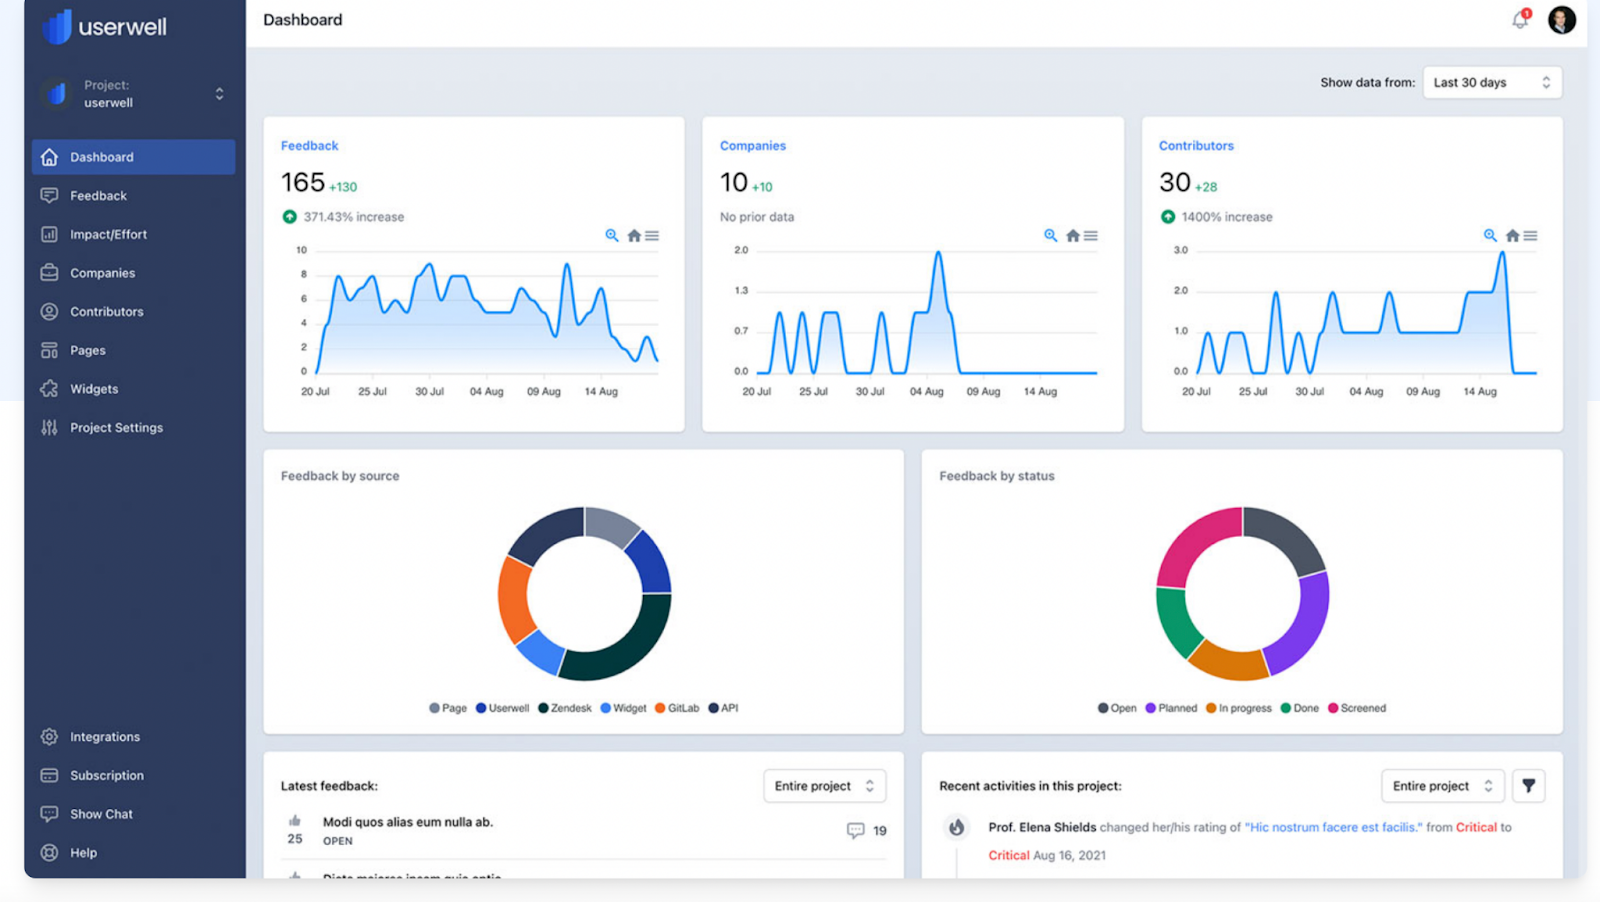
Once you start using Userwell, the dashboard acts as your central control panel. Here you can see at a glance the feedback you’re receiving, where it’s coming from, and the status of feedback you’re responding to. Feedback Overview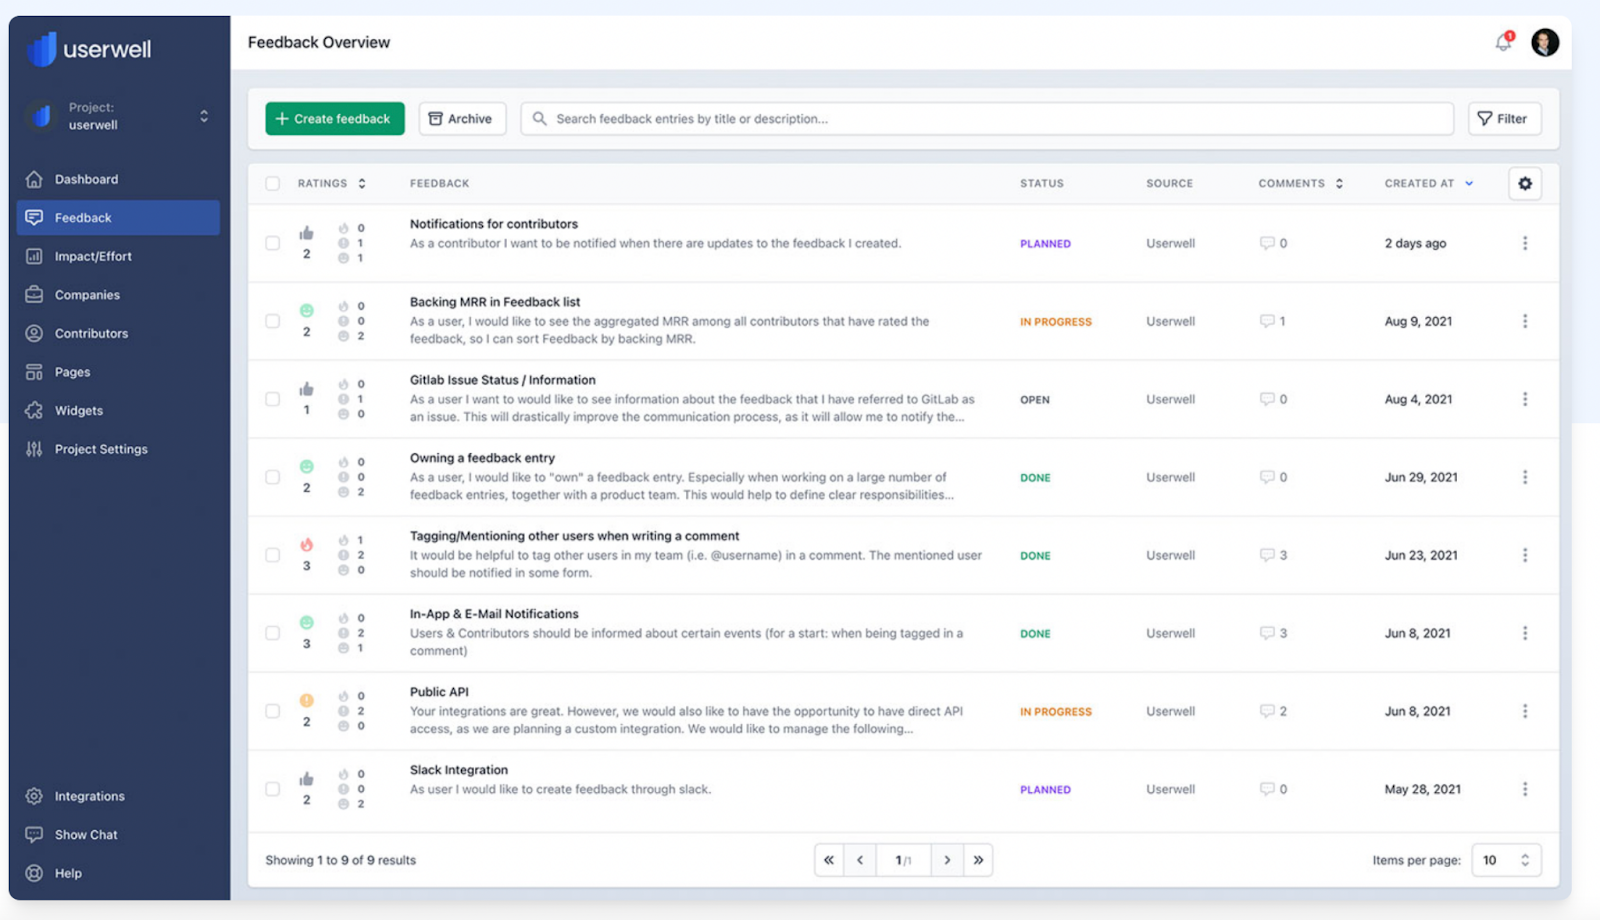
The feedback overview screen lets you see all the feedback that’s come in via the Feedwell platform or other sources, the date it was left, and its status. In addition, you can easily search for feedback or filter based on criteria such as category, source, or status. Impact/Effort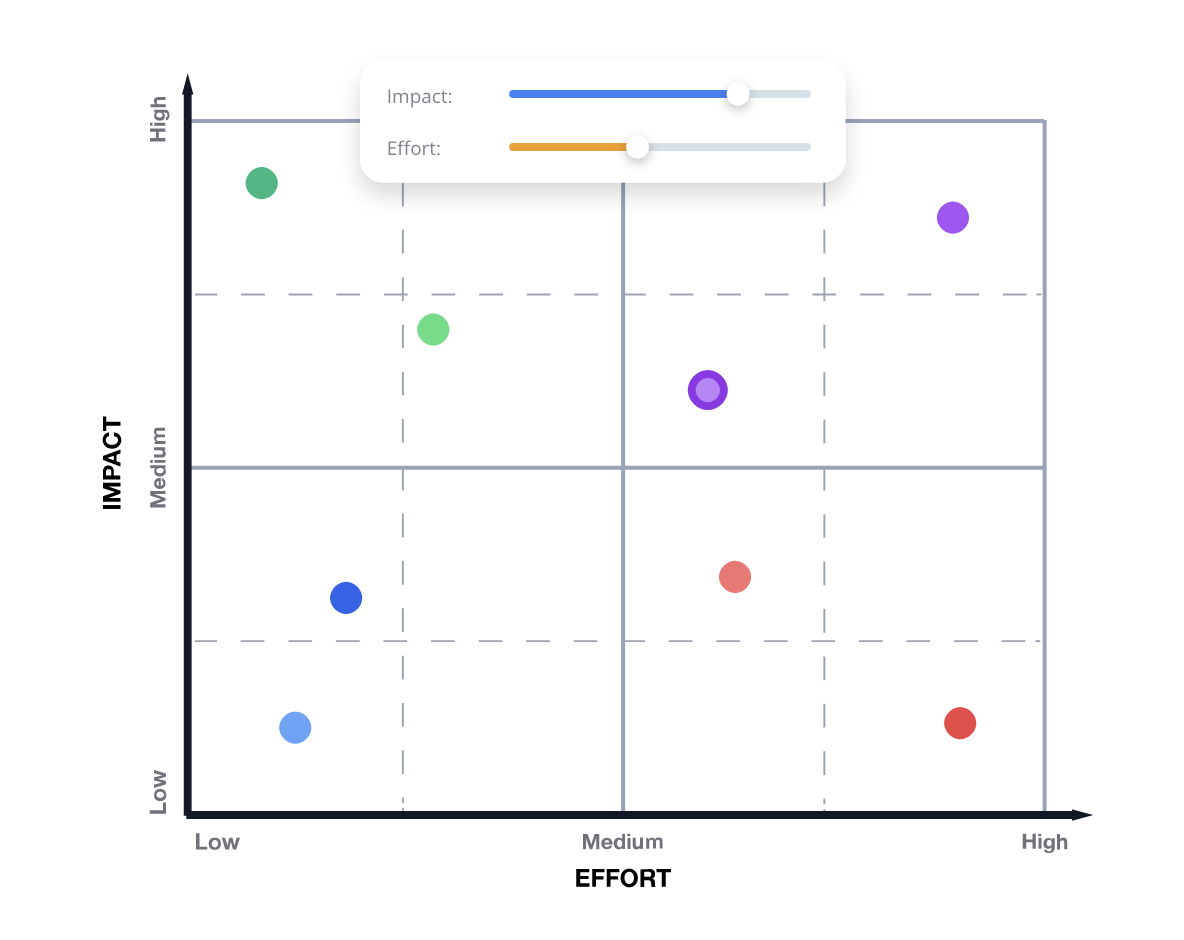
The Impact/Effort graph gives an instant overview of feedback you’ve scored so you can make data-based decisions on whether new features are worth the effort to implement them. In addition, automatic color coding enables you to see at a glance which features are quick wins and which are probably not worth doing. CompaniesThe companies page gives you an overview of the companies you’re working with and see which feedback contributors belong to which company (this is automatically deducted from the contributor email address). ContributorsThe contributors page gives an overview of all users who have provided feedback and shows all feedback attributed to a single user. PagesThis lists all feedback pages you have created. Creating a page is a simple process. You simply enter a name, subdomain, and logo for your feedback page, choose whether you want it to be private (visible to internal team members only) or public, choose a category for the feedback, and optionally add additional content such as release notes or a product roadmap. You can also toggle anonymous contributions on and off. 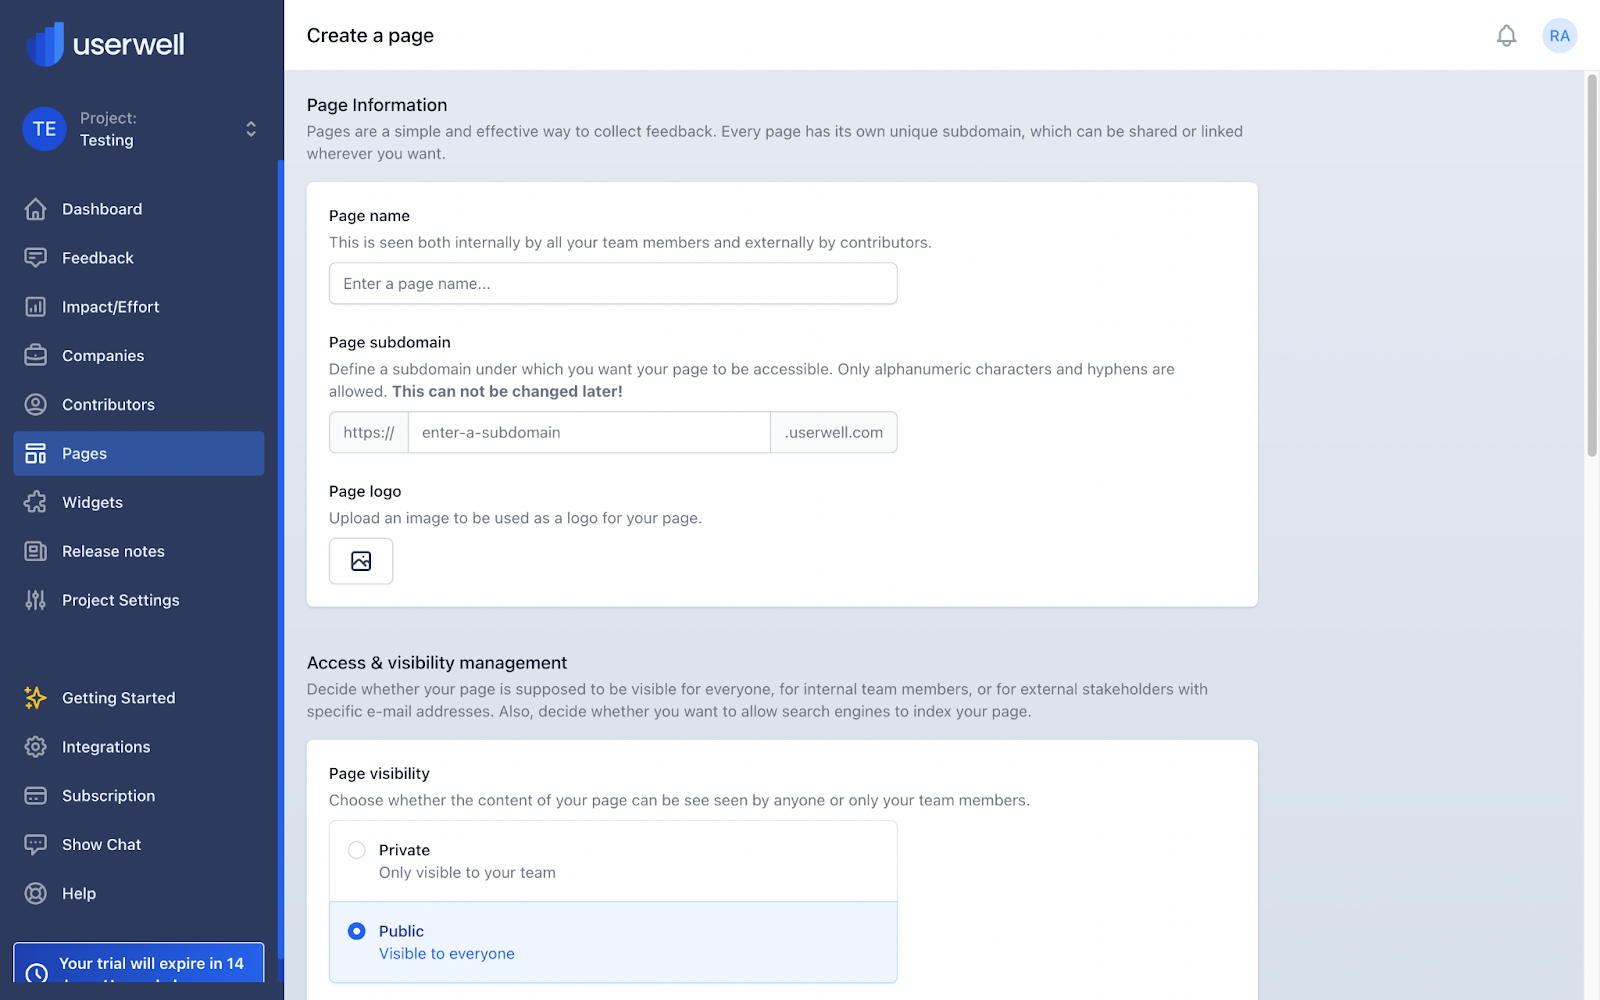
WidgetsIf you have created feedback widgets for your app, they will be listed here. The app widget is a great way to encourage users to leave feedback when they otherwise might not have bothered. 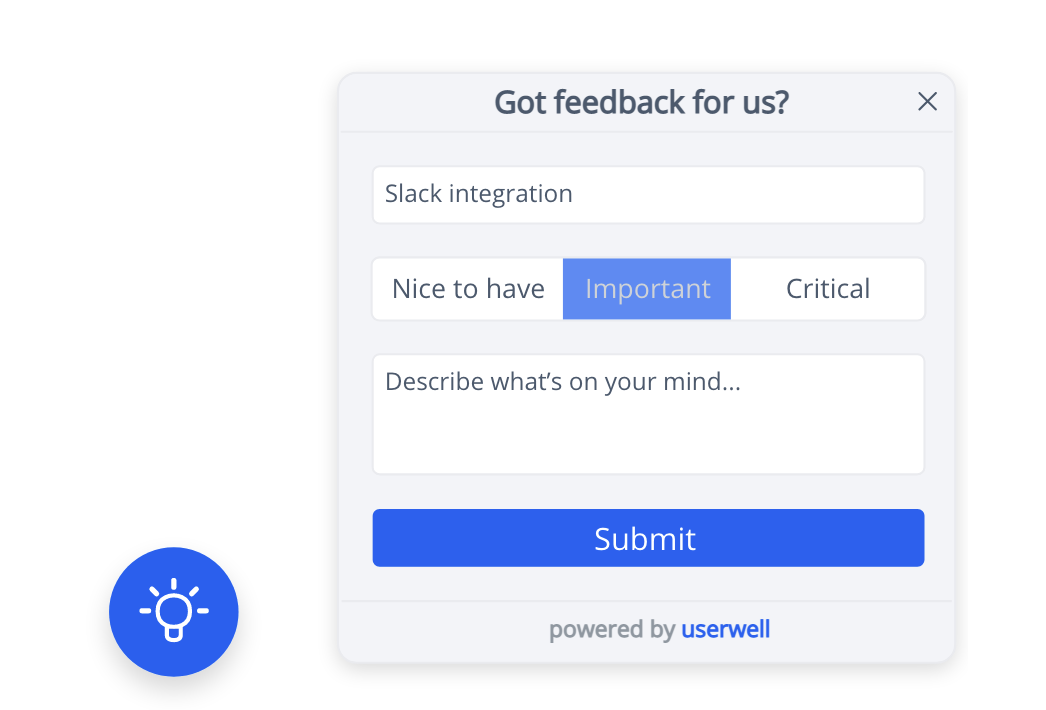
Release notesAll release notes you create for feature updates are stored here. Project SettingsOn the project settings page, you can assign or change an image, name, and owner for a project, add project members and assign it to a category. IntegrationsThe integrations dashboard lists popular third-party apps for feedback sources, insight generation, development workflow, and other miscellaneous apps so you can create API tokens for easy integration with Userwell. Userwell Pricing & PlansUserwell is available as two plans, depending on the size of your team and needs. You can also request a custom plan if the existing plans do not suit your business or workflow. Plans start from $79 a month (20% discount for paying annually), which supports up to 2 projects and 3 team members. On this plan, you can create unlimited feedback pages and track contributions from an unlimited number of users. You also have API access for building your own integrations. The Professional plan at $129 a month (20% discount for paying annually) supports up to 5 projects and 10 team members. This plan comes with premium support and the option of using custom domains and features. Summary – Is Userwell a Good Fit for Your Business?Development teams working primarily with B2B customers will get the most out of Userwell. If you struggle to manage feedback, reviews, and feature requests from multiple sources or want to do a better job of lining up new features and bug fixes with actual customer feedback and requests, Userwell will help to streamline your workflow and quickly identify the features that provide the greatest value for your company. Userwell’s feedback pages and app widgets also make it very easy for users to leave constructive feedback. Without a built-in feedback system like this, customers are inclined to leave reviews only if they have a terrible or excellent experience with the products they use. Proactively requesting feedback shows you care about your customers and improving your products and makes it easier for you to source customer testimonials for your website and social media pages. Userwell offers a 14-day trial with no credit card required. So if you’re looking for a feedback management platform for your app or SaaS business, it’s definitely worth giving it a go with your team. Find out more and get a free 14-day trial of Userwell The post Userwell Review – A Product Management Feedback Platform for B2B Businesses first appeared on Web Development Blog, News and Tutorials.Userwell Review – A Product Management Feedback Platform for B2B Businesses published first on http://7elementswd.tumblr.com/ via Tumblr Userwell Review – A Product Management Feedback Platform for B2B Businesses
0 Comments
How to set the default user for a WSL distro that has been manually installed with wsl --import11/2/2021 I’ve blogged before on how to easily move WSL distributions between Windows 10 machines with import and export. I recently did a full fresh install of Windows 11 and wanted to bring my existing highly customized Ubuntu installation along with me. You can tar up (zip up) the user-mode parts of your WSL2 distributions like this: wsl --export Ubuntu-20.04 c:\Temp\UbuntuBackup.tar The part after –export is the distribution name that you can see from running Next, on the machine you’ve moved to, you’ll do the reverse. Notice that I’ve changed the Distro name here, and you can if you want. Remember also that you can have as many Linux Distros installed as you want. wsl --import Ubuntu c:\Linux c:\Temp\UbuntuBackup.tar The Linux file system is stored in a VHDX (virtual hard drive), usually deep in AppData/Local/YadaYada, but this import is an opportunity for me to store it in C:\Linux which will also make it easier to do maintenance on like Compact-VHD which shrinks your WSL2 disks. Here’s the weird part. When you import a WSL2 distro manually, running that distro on the new machine will end up logging you in as root. It’s forgotten that I’m “scott.” There’s a lot of ways to fix this that involve the registry or passing in arguments to wsl, but I just want it to work when I run “ Run your distro, and then edit /etc/wsl.conf and add a [user] section like this: [user] This is the ideal way to set your WSL distro’s default user for imported tars because it’s stored inside the Linux file system and the setting will stick around when you export/import later on. 
Hope this helps! Sponsor: Lob APIs ensure your addresses are deliverable and everything you send arrives at the right place. Add address autocompletion and verification in minutes using React, Vue or Javascript - Try for free! © 2021 Scott Hanselman. All rights reserved. 


How to set the default user for a WSL distro that has been manually installed with wsl –import published first on http://7elementswd.tumblr.com/ via Tumblr How to set the default user for a WSL distro that has been manually installed with wsl --import I had a hard drive die recently so I decided to do a full fresh reinstall of Windows, this time a fresh Windows 11 from a downloaded ISO burned to a USB stick.
It was a solid install and everything worked out of the box. I used it for a few days and had no issues, but while poking around I noticed in the Device Manager that there were dozens of Base System Devices that were banged out. Like a TON. I’d like to get that fixed, so I went to Windows Update but WU said everything was cool. Since a lot of stuff moved and was redesigned in Windows 11 I went looking for “Windows Update Optional Updates” and it took me a while to find it, even though it’s listed right there on Windows Update in Settings. 
Click on Advanced Options. Here you can control things like your Windows Update active hours so it doesn’t reboot when you don’t want it, etc. Here you’ll see a bunch of Optional Updates. I had like 33 of them. 
Here’s what it looks like when you have a bunch of updates pending. These are Chipset and Motherboard updates. 
I did have to select each of these checkboxes and select Install at the end, but once they were done, I had no banged out (yellow exclamation point) devices in Device Manager. Hope this helps! Sponsor: Lob APIs ensure your addresses are deliverable and everything you send arrives at the right place. Add address autocompletion and verification in minutes using React, Vue or Javascript - Try for free! © 2021 Scott Hanselman. All rights reserved. 


How to fix Base System Device Driver issue in Windows 10 and Windows 11 published first on http://7elementswd.tumblr.com/ via Tumblr How to fix Base System Device Driver issue in Windows 10 and Windows 11 Great tweet from Oleg Kyrylchuk (follow him!) showing how cool Parallel.ForEachAsync is in .NET 6. It’s new! Let’s look at this clean bit of code in .NET 6 that calls the public GitHub API and retrieves n number of names and bios, given a list of GitHub users: using System.Net.Http.Headers; Let’s note a few things in this sample Oleg shared. First, there’s no Main() as that’s not required (but you can have it if you want). We also see just two usings, bringing other namespaces into scope. Here’s what it would look like with explicit namespaces: using System; We’ve got an array of users to look up in userHandlers. We prep an HttpClient and setup some ParallelOptions, giving our future ForEach the OK to “fan out” to up to three degrees of parallelism - that’s the max number of concurrent tasks we will enable in one call. If it’s -1 there is no limit to the number of concurrently running operations. The really good stuff is here. Tight and clean: await Parallel.ForEachAsync(userHandlers, parallelOptions, async (uri, token) => “Take this array and naively fan out into parallel tasks and make a bunch of HTTP calls. You’ll be getting JSON back that is shaped like the GitHubUser.” We could make it even syntactically shorter if we used a record vs a class with this syntax: public record GitHubUser (string Name, string Bio); This makes “naïve” parallelism really easy. By naïve we mean “without inter-dependencies.” If you want to do something and you need to “fan out” this is super easy and clean. Sponsor: Make login Auth0’s problem. Not yours. Provide the convenient login features your customers want, like social login, multi-factor authentication, single sign-on, passwordless, and more. Get started for free. © 2021 Scott Hanselman. All rights reserved. 


Parallel.ForEachAsync in .NET 6 published first on http://7elementswd.tumblr.com/ via Tumblr Parallel.ForEachAsync in .NET 6 Award for longest blog post title ever? Andrey Muzychenko has a great github repository where they decompiled the 25 year old Space Cadet Pinball application from Windows 95/XP and then recompiled it for Linux (and really any platform now that it’s portable code!).
I recently did a YouTube where I showed that Windows 11 runs Graphical Linux Apps out of the box with WSLg. Here, they’ve taken a Windows 95 32-bit app and decompiled it from the original EXE, done some nice cleanup, and now it can be recompiled to other targets like Linux. So, could I go Windows 95 -> Linux -> Windows 11 -> WSL -> WSLg and run this new native Linux executable again on Windows? If you don’t think this is cool, that’s a bummer. It’s an example of how powerful (and fun) virtualization has become on modern systems! 
I just launched WSL (Ubuntu) and installed a few things to compile the code: sudo apt-get install libsdl2-image-dev Then I cloned the repo under WSL and built. It builds into bin and creates a Linux executable.
I am a digital hoarder so I have digital copies of basically everything I’ve worked on for the last 30 years. I happened to have a Windows XP virtual disk drive from a VM from years ago that was saved on my Synology.
I was able to open it and get all the original resources and wav files.
Then I copy all the original resources minus the .exe and then run the newly built Linux version…and it magically pops out and runs on Windows…as a graphical Linux app. 
Amazing! Have fun! Sponsor: Make login Auth0’s problem. Not yours. Provide the convenient login features your customers want, like social login, multi-factor authentication, single sign-on, passwordless, and more. Get started for free. © 2021 Scott Hanselman. All rights reserved. 


Space Cadet Pinball for Windows 95 recompiled for Linux running on Windows 11 as a Linux app under WSLg published first on http://7elementswd.tumblr.com/ via Tumblr Space Cadet Pinball for Windows 95 recompiled for Linux running on Windows 11 as a Linux app under WSLg Fotobehang is populair en dat is natuurlijk niet zonder reden. Een levensechte afbeelding in je woonkamer, slaapkamer of gang spreekt tot de verbeelding. Er zijn bovendien allerlei soorten thema’s om een keuze uit te maken, zodat het fotobehang ook nog eens perfect in je interieur past. Kijk maar eens op photowall.nl, waar je een verscheidenheid aan populair fotobehang in het aanbod ziet. Bijvoorbeeld over natuurfenomenen net als over planten en bloemen of hedendaagse kunst. Doe hier nog veel meer inspiratie en ideeën op om je interieur te verfraaien en maak ook gebruik van de handige tips. Haal de natuur in huisEen van de trends op het gebied van fotobehang is de natuur van buiten naar binnen halen. Er zijn allerlei natuurfenomenen die zich perfect lenen voor mooie afbeeldingen. Denk maar een mistig bos dat afgebeeld op fotobehang prachtig staat in een slaapkamer. Of aan bergen, waar een mistige waas hangt die mysterieus aandoet. Zo zijn er ook prachtige meren en bergen met daarboven een blauwe lucht die direct tot de verbeelding spreken. Heb je een kinderkamer die je wilt opfleuren dan zijn er ook sprookjesachtige natuurfenomenen in op een bijzondere manier in fotobehang vorm hebben gekregen. Denk maar aan een kleurrijke regenboog die de kinderkamer van een vrolijke uitstraling voorziet. Zo zijn er ook allerlei natuurfenomenen die geïnspireerd zijn op fantasiefiguren. Een stoere kinderkamer is te realiseren door voor fotobehang te kiezen met een wild beest erop afgebeeld, zoals een panter, luipaard of leeuw. Kies voor kunst op de hele muurWaarom een schilderij aan de wand ophangen als je van je hele muur een compleet kunstwerk kan maken? Er zijn allerlei mogelijkheden om wat design aan je interieur toe te voegen door voor fotobehang als kunstwerk te kiezen. Hedendaagse kunst kan een abstracte vorm aannemen op fotobehang, maar ook een realistische weergave zijn van een bepaald onderwerp. Als je voor fotobehang als kunstwerk aan de muur kiest dan weet je zeker dat je een blikvanger in huis haalt. Kunst op de hele muur als fotobehang staat prachtig in een woonkamer met een moderne inrichting. De mogelijkheden zijn bovendien eindeloos, zodat je ook nog met de kleurstelling rekening kan houden. Heb je weinig kleur in het interieur dan is het ideaal om fotobehang met een kleurrijk kunstwerk te kiezen. Bij specifiek kleurgebruik stem je de kleur van het fotobehang simpel op de kleurtinten in je interieur af. Creëer gezelligheid in huisHet is gedurfd en gewaagd, maar ook heel bijzonder als je voor fotobehang kiest met eten en drinken als thema. Als liefhebber van wijn is het toch fantastisch om fotobehang in je woonkamer te hebben hangen waar een wijnvaten op staan afgebeeld. Zo is het ook mogelijk om fotobehang met een wijnfles en wijnglas op een muur aan te brengen. Of als je van meerdere drankjes houdt, is het geweldig leuk om fotobehang te hebben met allerlei soorten flessen drank. Dan lijkt het erop alsof je in een bar staat om wat te bestellen. Dit type fotobehang staat natuurlijk ook prachtig in een echte mancave. Fotobehang aanbrengenHet is bij het behangen met fotobehang natuurlijk van groot belang dat de banen perfect op elkaar aansluiten. Het is dan handig als de rollen in oplopende volgorde beschikbaar zijn. Je hoeft dan alleen nog maar lijm op de muur aan te brengen om daarna per baan het fotobehang op te plakken. Behang op maat is wat dat betreft ideaal, maar het is wel belangrijk om zelf de wand op te meten. Er zit nogal eens verschil in wanden die niet allemaal van zichzelf helemaal recht zijn. Het meten doe je daarom het beste op verschillende plekken op de wand. Bestel ook net even wat meer fotobehang dan je nodig hebt, omdat je dan een beetje speling overhoudt. Je kan fotobehang prima zelf op een muur aanbrengen als je de instructies nauwkeurig opvolgt die meegeleverd worden. Het bericht Fotobehang: inspiratie, ideeën en tips verscheen eerst op Webshopblog. Fotobehang: inspiratie, ideeën en tips published first on http://7elementswd.tumblr.com/ via Tumblr Fotobehang: inspiratie, ideeën en tips
Here’s a few great DON’T and DO examples, but be sure to Star the repo and check it out for yourself! This is somewhat advanced stuff but if you are doing high output low latency web services AT SCALE these tips will make a huge difference when you’re doing a something a hundred thousand time a second! DON’T - This example uses the legacy WebClient to make a synchronous HTTP request. public string DoSomethingAsync() DO - This example uses an HttpClient to asynchronously make an HTTP request. static readonly HttpClient client = new HttpClient(); Here’s a list of ASP.NET Core Guidance. This one is fascinating. ASP.NET Core doesn’t buffer responses which allows it to be VERY scalable. Massively so. As such you do need to be aware that things need to happen in a certain order - Headers come before Body, etc so you want to avoid adding headers after the HttpResponse has started. DON’T - Add headers once you’ve started sending the body. app.Use(async (next, context) => DO - Either check if it’s started before you send the headers: app.Use(async (next, context) => Or even BETTER, add the headers on the OnStarting call back to guarantee they are getting set. app.Use(async (next, context) => There’s a ton of great guidance around async programming. If you are returning something small or trivial, like a simple value, DON’T Task<>: public class MyLibrary DO use ValueTask<> as this example not only doesn’t use an extra threads and avoids heap allocation entirely: public class MyLibrary There’s a ton of good learning over there so go check it out! https://github.com/davidfowl/AspNetCoreDiagnosticScenarios Sponsor: Make login Auth0’s problem. Not yours. Provide the convenient login features your customers want, like social login, multi-factor authentication, single sign-on, passwordless, and more. Get started for free. © 2021 Scott Hanselman. All rights reserved. 


ASP.NET Core Diagnostic Scenarios published first on http://7elementswd.tumblr.com/ via Tumblr ASP.NET Core Diagnostic Scenarios
He points out that “.NET has 4 built-in dictionary/map types [and] there’s no guidance on when to use what, mostly individual documentation on each implementation.”
There is actually some good documentation on C# Collections and Data Structures here that we can compare and combine with David’s good advice as well!
Definitely important to remember. Generics have been around since .NET Framework 2.0 around 15 years ago so this is a good reason to consider avoiding Hashtable and using Dictionary<> instead. Hashtable is weakly typed and while it allows you to have keys that map to different kinds of objects which may seem attractive at first, you’ll need to “box” the objects up and boxing and unboxing is expensive. You’ll almost always want to use Dictionary instead. If you’re accessing your collection across threads, consider the System.Collections.Concurrent namespace or using System.Collections.Immutable which is thread-safe because you’ll always be working on a copy as the original collection is immutable (not modifiable). David says this about
Or perhaps
Another one that isn’t often used but I’ll add as it’s good to know about is
This is great advice from David:
Measure and test, measure and test. Good luck to you! Sponsor: Make login Auth0’s problem. Not yours. Provide the convenient login features your customers want, like social login, multi-factor authentication, single sign-on, passwordless, and more. Get started for free. © 2021 Scott Hanselman. All rights reserved. 


Differences between Hashtable vs Dictonary vs ConcurrentDictionary vs ImmutableDictionary published first on http://7elementswd.tumblr.com/ via Tumblr Differences between Hashtable vs Dictonary vs ConcurrentDictionary vs ImmutableDictionary 
There’s a few things here to consider when using prefers-color-scheme and detecting dark mode:
You can set your Chrome/Edge browser to use System Settings, Light, or Dark. Search for Theme in Settings.
All this, and I can only do it on my lunch hour because this blog isn’t my actual day job. Let’s go! The prefers-color-scheme CSS Media QueryI love CSS @media queries and have used them for many years to support mobile and tablet devices. Today they are a staple of responsive design. Turns out you can just use a @media query to see if the user prefers dark mode.
@media (prefers-color-scheme: dark) {
Sweet. Anything inside here (the C in CSS stands for Cascading, remember) will override what comes before. Here’s a few starter rules I changed. I was just changing stuff in the F12 tools inspector, and then collecting them back into my main CSS page. You can also use variables if you are an organized CSS person with a design system. These are just a few, but you get the idea. Note the .line-tan example also where I say ‘just put it back to it’s initial value.’ That’s often a lot easier than coming up with “the opposite” value, which in this case would have meant generating some PNGs.
@media (prefers-color-scheme: dark) {
Sweet. This change to my main css works for the http://hanselman.com main site. Let’s do the blog now, which includes the 3rd party syntax highlighter. I use the same basic rules from my main site but then also had to (sorry CSS folks) be aggressive and overly !important with this very old syntax highlighter, like this:
@media (prefers-color-scheme: dark) {
Your mileage may vary but it all depends on the tools. I wasn’t able to get this working without the !important which I’m told is frowned upon. My apologies. Detecting Dark Mode preferences with JavaScriptThe third party control I use for my podcast is a like a lot of controls, it’s an iFrame. As such, it takes some parameters as URL querystring parameters. I generate the iFrame like this: <iframe id='simpleCastPlayeriFrame' If I add “dark=true” to the querystring, I’ll get a different player skin. This is just one example, but it’s common that 3rd party integrations will either want a queryString or a variable or custom CSS. You’ll want to work with your vendors to make sure they not only care about dark mode (thanks Simplecast!) and that they have a way to easily enable it like this. 
But this introduce some interesting issues. I need to detect the preference with JavaScript and make sure the right player gets loaded. I’d also like to notice if the theme changes (light to dark or back) and dynamically change my CSS (that part happens automatically by the browser) and this player (that’s gotta be done manually, because dark mode was invoked via a URL querystring segment.) Here’s my code. Again, not a JavaScript expert but this felt natural to me. If it’s not super idiomatic or it just sucks, email me and I’ll do an update. I do check for window.matchMedia to at least not freak out if an older browser shows up.
if (window.matchMedia) {
toggleDarkMode is a method so I can use it for the initial state and the 'change’ state. It uses the URL object because parsing strings is so 2000-and-late. I set the searchParams rather than .append because I know it’s always set. I set it. As I write this I supposed I could have stored the document.querySelector() like I did the matchMedia, but I just saw it now. Darn. Still, it works! So I #shipit. I am sure I missed a page or two or a element or three so if you find a white page or a mistake, file it here https://github.com/shanselman/hanselman.com-bugs/issues and I’ll take a look when I can. All in all, a fun lunch hour. Thanks Stevö for the nudge! Now YOU, Dear Reader can go update YOUR sites for both Light Mode and Dark Mode. Sponsor: The No. 1 reason developers choose Couchbase? You can use your existing SQL++ skills to easily query and access JSON. That’s more power and flexibility with less training. Learn more. © 2021 Scott Hanselman. All rights reserved. 


How to detect if the User’s OS prefers dark mode and change your site with CSS and JS published first on http://7elementswd.tumblr.com/ via Tumblr How to detect if the User's OS prefers dark mode and change your site with CSS and JS
David has been quietly creating an amazing piece of documentation for Minimal APIs in .NET 6. At some point when it’s released we’ll work with David to get everything promoted to formal documentation, but as far as I’m concerned if he is slapping the keyboard anywhere and it shows up anywhere with a URL then I’m happy with the result! Let’s explore a big here and I encourage you to head over to the main Gist here. To start, we see how easy it is to make a .NET 6 (minimal) app to say Hello World over HTTP on localhost:5000/5001 var app = WebApplication.Create(args); Lovely. It’s basically nothing. Can I do more HTTP Verbs? Yes.
app.MapGet("/", () => "This is a GET");
What about other verbs? More than one?
app.MapMethods("/options-or-head", new [] { "OPTIONS", "HEAD" }, () => "This is an options or head request ");
Lambda expressions, not objects, are our “atoms” that we build molecules with in this world. They are the building blocks.
app.MapGet("/", () => "This is an inline lambda");
But it’s just a function, so you can organize things however you want! var handler = new HelloHandler(); You can capture route parameters as part of the route pattern definition.
app.MapGet("/users/{userId}/books/{bookId}", (int userId, int bookId) => $"The user id is {userId} and book id is {bookId}");
Route constraints are influence the matching behavior of a route. See how this is in order of specificity:
app.MapGet("/todos/{id:int}", (int id) => db.Todos.Find(id));
Attributes can be used to explicitly declare where parameters should be bound from! So you can pick and choose from all over! using Microsoft.AspNetCore.Mvc; I can customize the response:
app.MapGet("/todos/{id}", (int id, TodoDb db) =>
Here’s a cool example of taking a file upload and writing it to a local file. Nice and clean.
app.MapGet("/upload", async (HttpRequest req) =>
Go check out this great (and growing) online resource to learn about .NET 6 minimal APIs. Sponsor: YugabyteDB is a distributed SQL database designed for resilience and scale. It is 100% open source, PostgreSQL-compatible, enterprise-grade, and runs across all clouds. Sign up and get a free t-shirt. © 2021 Scott Hanselman. All rights reserved. 


Minimal APIs at a glance in .NET 6 published first on http://7elementswd.tumblr.com/ via Tumblr Minimal APIs at a glance in .NET 6 |
About UsIf you want to keep up with the latest in web design, you have to be willing to study and learn on an ongoing basis. If you are a web developer or web designer, you’ll find a lot of useful tutorials and code snippets collection here. Furthermore, we also discuss more general topics of web design and how the role of a web designer has evolved over the years.
|


 David and friends has a great repository filled with examples of “broken patterns” in ASP.NET Core applications. It’s a fantastic learning resource with both markdown and code that covers a number of common areas when writing scalable services in ASP.NET Core. Some of the guidance is general purpose but is explained through the lens of writing web services.
 I’m very much

 RSS Feed
